 8:42 PM
 Jade Byfield

Tutorial 1 - Creating a custom ListView with unique style and elements
In this tutorial, we're going to go over the basics of Android's ListView container and see how we can customize it so it looks a little less...well..plain. The default layout that ships with the sdk is fine. It's basically just a listed view containing text fields with a black background. You can find out more about creating a standard ListView here See photo below.

However, if you want to customize your ListView so it looks a little different and contains dynamic data..keep reading. I used this design in an app I wrote called EZ Pics Photo album, basically an easier way to sort/organize your photos on your Android device. We will build this ListView from scratch, see the end result below.
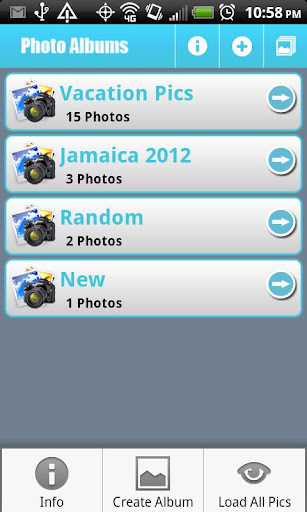
Only one caveat; Disregard the ActionBar at the top of this layout, as we will not be building this design pattern in this tutorial. For that, I used the GreenDroid open source library which you can find on GitHub.
Also, There are 2 drawables that I made for the purpose of this project. The photos/camera icon on the left and the blue arrow on the right. I haven't included these files in this tutorial, so feel free to use your own drawables.
Now onto our custom ListView. Let's break down what components make up this viewgroup before we get to writing any code.
1) Notice that each element in the ListView contains 4 pieces of data. ImageView, ImageView, TextView, TextView
2) Notice that there is a space between each view in the list. This space is called a divider.
3) Notice that this ListView contains dynamic data, ie; number of photos is different in each element, as well as the TextView title. The ImageViews on the left and right sides remain the same.
4) The ListView rows have a sort of grey-gradient style to them rather than a flat, solid color that the standard one provides.
Let's set up our files. Create new project in Eclipse. You will need these 2 files in your res/layout folder.
main.xml
listview_row.xml
In your drawable folder, you will need to create these files
list_divider.xml
list_item_normal.xml
list_item_pressed.xml
list_item_selected.xml
listview_background.xml
selector.xml
shape_background_grey.xml
In your res/values folder, create these files.
styles.xml
These are basically all the resource files you will need. We will break down each in order to fully understand how we couple XML with Java in this project to achieve the desired results.
Ok, so first our main.xml. This file should look like this.
Main.xml
 1 <?xml version="1.0" encoding="utf-8"?>
 2 <LinearLayout xmlns:android="http://schemas.android.com/apk/res/android"
 3
 4     android:layout_width="fill_parent"
 5     android:layout_height="fill_parent"
 6     android:background="#708090"
 7     android:orientation="vertical" >
 8
 9     <ListView
10         android:id="@+id/lvAlbumList"
11         android:layout_width="fill_parent"
12         android:layout_height="wrap_content"
13         android:cacheColorHint="#00000000"
14         android:clickable="false"
15         android:divider="@drawable/list_divider"
16         android:dividerHeight="3dp"
17         android:listSelector="@drawable/selector"
18         android:drawSelectorOnTop="false"
19
20         android:padding="2dp" >
21     </ListView>
22
23
24
25
26 </LinearLayout>
listview_row.xml
Our listview_row.xml will represent each individual row in our list. You'll notice that unlike the default ListView tutorial, we are creating a separate xml file to represent an individual row. Why? This is because we will later create a custom ListAdapter that will be responsible for not only inflating each view in the list, but binding the data to it as well. We want to have total control over how each element in our list is drawn, and also because we will be extending Activity instead of ListActivity.
We use a RelativeLayout as our root view because it gives us more control over how we can position our child views. We will assign a custom background to this layout in a bit. Remember that we have 4 children views(2 TextViews and 2 ImageViews). Play around with the gravity, padding, and position of each of your ImageViews and TextViews in order to get your desired result. The code is below
 1 <?xml version="1.0" encoding="utf-8"?>
 2 <RelativeLayout xmlns:android="http://schemas.android.com/apk/res/android"
 3     android:id="@+id/relativeLayout1"
 4     android:layout_width="fill_parent"
 5     android:layout_height="fill_parent"
 6     android:background="@drawable/listview_background"
 7     android:padding="5dip" >
 8
 9     <ImageView
10         android:id="@+id/imgViewLogo"
11         android:layout_width="50dip"
12         android:layout_height="50dip"
13         android:layout_alignParentLeft="true"
14         android:scaleType="fitXY"
15         android:src="@drawable/imgview_drawable" >
16     </ImageView>
17
18     <TextView
19         android:id="@+id/txtViewTitle"
20         android:layout_width="wrap_content"
21         android:layout_height="wrap_content"
22         android:layout_marginLeft="2dip"
23         android:layout_toRightOf="@+id/imgViewLogo"
24         android:text="TextView"
25         android:textAppearance="?android:attr/textAppearanceLarge"
26         android:textColor="#43c6db"
27         android:textStyle="bold" >
28     </TextView>
29
30     <TextView
31         android:id="@+id/txtViewDescription"
32         android:layout_width="wrap_content"
33         android:layout_height="wrap_content"
34         android:layout_below="@+id/txtViewTitle"
35         android:layout_marginLeft="2dip"
36         android:layout_toRightOf="@+id/imgViewLogo"
37         android:text="TextView"
38         android:textColor="#000000"
39         android:textStyle="bold" >
40     </TextView>
41
42     <ImageView
43         android:id="@+id/imgViewArrow"
44         android:layout_width="35dip"
45         android:layout_height="35dip"
46         android:layout_alignParentRight="true"
47         android:layout_marginTop="3dp"
48         android:scaleType="fitXY"
49         android:src="@drawable/custom_arrow" >
50     </ImageView>
51
52 </RelativeLayout>
Next, create a res/drawable folder if you don't already have one. This is where we'll define a few more xml files that will make our ListView even more powerful and customized.
listview_background.xml
This is where we define our background of our list view. This xml file defines a shape object and basically specifies that it will be colored using a gradient. the start, center and end colors. Feel free to play around with this color values as well if you want your background to be a different color. Or maybe you don't want a gradient at all. That's fine. Play around with different values in this file in order to get your list items to look just how you want.
The <corners> element is what defines the rounded edges of our list items. Remove this if you don't want them to be rounded. I thought it looked cool so that's why I included it in my project.
 1 <?xml version="1.0" encoding="utf-8"?>
 2 <shape xmlns:android="http://schemas.android.com/apk/res/android"
 3     android:shape="rectangle">
 4
 5     <gradient
 6         android:centerColor="#E6E6E6"
 7         android:endColor="#CCCCCC"
 8         android:startColor="#FFFFFF" android:angle="270"/>
 9     <!--
10          <gradient android:startColor="#FF66CFE6" android:centerColor="#FF207FB9"
11         android:endColor="#FF0060B8" android:angle="270"/>
12     -->
13
14     <stroke
15         android:width="2dp"
16         android:color="#43c6db" />
17
18     <padding
19         android:bottom="3dp"
20         android:left="3dp"
21         android:right="3dp"
22         android:top="3dp" />
23
24     <corners android:radius="7dp" />
25
26 </shape>
selector.xml
Now that we've defined our listview row and it's background style. Let's define a custom selector for when each element in our list is touched.
<?xml version="1.0" encoding="utf-8"?>
 <shape xmlns:android="http://schemas.android.com/apk/res/android"
     android:shape="rectangle">

      <gradient
         android:centerColor="#adff2f"
          android:endColor="#adff2f"
          android:startColor="#adff2f" android:angle="270"/>
      <!--
          <gradient android:startColor="#FF66CFE6" android:centerColor="#FF207FB9"
         android:endColor="#FF0060B8" android:angle="270"/>
    -->

    <stroke         android:width="2dp"
         android:color="#43c6db" />

     <padding
         android:bottom="3dp"
         android:left="3dp"
        android:right="3dp"
        android:top="3dp" />

     <corners android:radius="7dp" />

 </shape>
list_divider.xml
 1 <?xml version="1.0" encoding="utf-8"?>
 2 <layer-list xmlns:android="http://schemas.android.com/apk/res/android" >
 3
 4     <item>
 5         <shape>
 6             <gradient
 7                 android:angle="90"
 8                 android:endColor="#708090"
 9                 android:height="2dp"
10                 android:startColor="#708090" />
11
12
13             <corners android:radius="7dp" />
14         </shape>
15     </item>
16
17 </layer-list>
This is to define our divider between our list elements. The android:height attribute tells us that our space between the list elements will be 2 density independent pixels high. If you don't want the items in your list to have a divider, simply skip creating this file and remove the android:divider tag from the main.xml file that we created above.
If were to run our app now, we should get something like the below result

Ok, so you just set up your project and copied all that code. You define your listview, it's background and even
 a custom selector. You launched the MainActivity, where's the list?

The ListView contains no elements, you have an empty list. So nothing shows up because you
didn't feed your list any views to be drawn. We need to do a few more things in order to get our listview up and running.

Let's extract our custom ListView from it's parent in main.xml, inflate it..and fill it with some data.
 This is known as data binding. We'll have to create a custom ListAdapter that will do the binding for us each time our list receives new data.

This is what the MainActivity class should look like as of now
 1 package com.aquarius.customlistviewproject;
 2
 3 import android.app.Activity;
 4 import android.os.Bundle;
 5
 6 import android.widget.ListView;
 7
 8 public class MainActivity extends Activity {
 9
10  ListView albumList;
11
12  @Override
13  public void onCreate(Bundle savedInstanceState) {
14   super.onCreate(savedInstanceState);
15   setContentView(R.layout.main);
16
17   albumList = (ListView) findViewById(R.id.lvAlbumList);
18  }
19
20 }
We've created a ListView object and then we inflated it using findViewById.
Next, create another class named ListViewCustomAdapter. The code for that class
looks like this
1 package com.jbsoft.TravelAlbums;
 2
 3 import java.util.ArrayList;
 4
 5
 6
 7 import android.app.Activity;
 8 import android.content.Context;
 9 import android.view.LayoutInflater;
10 import android.view.View;
11 import android.view.ViewGroup;
12 import android.widget.BaseAdapter;
13 import android.widget.ImageView;
14 import android.widget.TextView;
15
16
17 public class ListViewCustomAdapter extends BaseAdapter {
18
19  public ArrayList<String> album_names;
20
21  public ArrayList<String> photos;
22
23  public Activity context;
24
25  public LayoutInflater inflater;
26
27  public ListViewCustomAdapter(Activity context,
28    ArrayList<String> album_names, ArrayList<String> photos) {
29   // TODO Auto-generated constructor stub
30   super();
31   this.context = context;
32   this.album_names = album_names;
33   this.photos = photos;
34
35   this.inflater = (LayoutInflater) context
36     .getSystemService(Context.LAYOUT_INFLATER_SERVICE);
37  }
38
39  public int getCount() {
40   // TODO Auto-generated method stub
41   return album_names.size();
42  }
43
44  public Object getItem(int position) {
45   // TODO Auto-generated method stub
46   return null;
47  }
48
49  public long getItemId(int position) {
50   // TODO Auto-generated method stub
51   return 0;
52  }
53
54  public class ViewHolder {
55   ImageView thumbnail;
56   TextView txtViewAlbum;
57   TextView txtViewPhotos;
58
59  }
60
61  public View getView(int position, View convertview, ViewGroup parent) {
62   // TODO Auto-generated method stub
63
64   ViewHolder holder;
65   if (convertview == null) {
66    holder = new ViewHolder();
67    convertview = inflater.inflate(R.layout.listview_row, null);
68
69
70    holder.thumbnail = (ImageView) convertview
71      .findViewById(R.id.imgViewLogo);
72    holder.txtViewAlbum = (TextView) convertview
73      .findViewById(R.id.txtViewTitle);
74    holder.txtViewPhotos = (TextView) convertview
75      .findViewById(R.id.txtViewDescription);
76
77    convertview.setTag(holder);
78   }
79
80   else
81
82    holder = (ViewHolder) convertview.getTag();
83
84   holder.thumbnail.setImageResource(R.drawable.imgview_drawable);
85   holder.txtViewAlbum.setText(album_names.get(position));
86   holder.txtViewPhotos.setText(photos.get(position));
87
88   return convertview;
89  }
90
91 }
The most important method in this class is the getView() method. It is responsible
for basically giving us a converView that we can reuse to fill with our data. First, we check
if it's null..and if it is, we attach our default views to it.
Then we use convertView.setTag(holder) to store our views. If the convertView is not
null, then we get the views that we stored with it and set our data to it.
The final code for the MainActivity class is below.
package com.aquarius.customlistviewproject;

import java.util.ArrayList;

import android.app.Activity;
import android.os.Bundle;

import android.view.View;
import android.view.ViewGroup;
import android.widget.BaseAdapter;
import android.widget.ListView;

public class MainActivity extends Activity {

 ListView albumList;

 ArrayList<String> albums;
 ArrayList<String> photos;

 CustomListViewAdapter adapter;

 @Override
 public void onCreate(Bundle savedInstanceState) {
  super.onCreate(savedInstanceState);
  setContentView(R.layout.main);

  albumList = (ListView) findViewById(R.id.lvAlbumList);


  fillData();

  //set up our adapter and attach it to the ListView
  adapter = new CustomListViewAdapter(this, albums, photos);
  albumList.setAdapter(adapter);
 }

 //Fill our arrays with some trivial String data
 private void fillData() {

  albums = new ArrayList<String>();
  photos = new ArrayList<String>();

  albums.add("Album1");
  albums.add("Album2");
  albums.add("Album3");
  albums.add("Album4");
  albums.add("Album5");
  albums.add("Album6");

  photos.add("1 photo");
  photos.add("2 photos");
  photos.add("3 photos");
  photos.add("4 photos");
  photos.add("5 photos");
  photos.add("6 photos");


 }


}
This should produce the result below. Note that we hardcoded some strings to fill the
ArrayLists, but that you can fill them however you like. Whether you want to get data off a server via XML, JSON or
whatever, just store the strings in an ArrayList and use it the same way. Also, play around
with the XML files in order to get your listview style to look just how you desire.


0 comments:
Post a Comment